Pelican tutorial with Github Pages and CircleCI - 1
Posted on 07-31-2022 in Tutoriais • 4 min read
Hi!
As promised, we’ll cover how I created my blog with Pelican, Github Pages and CircleCI in a tutorial. As it is a lot of content, we will divide it into parts and here we will see an introduction to Pelican.
To recap, Pelican is a static site generator, that is, it generates a static HTML site based on content written in a Markup language, usually rich text or markdown. Pelican generates the posts using Jinja2 as the template library. So, if you have some familiarity with jinja or Django, which has a similar template library, you won’t have any difficulties in, for example, creating or customizing themes for Pelican.
First, to create a website with Pelican, let’s install it.
It can be in a virtual environment or directly in your default python installation. In the terminal, run:
pip install pelican[markdown]
This will install Pelican with Markdown support, which is my favorite markup language.
Finishing your installation, let’s create a Pelican website.
Create a folder where your site will be, so we can run commands from there. On Linux it would be something like this:
mkdir ~/projects/my_blog/ -p
cd ~/projects/my_blog
So now let’s run a Pelican command that will start our blog.
pelican-quickstart
This script will ask you several questions.
> Where do you want to create your new web site? [.]
> What will be the title of this web site?
> Who will be the author of this web site?
> What will be the default language of this web site? [en]
> Do you want to specify a URL prefix? e.g., https://example.com (Y/n)
> Do you want to enable article pagination? (Y/n)
> What is your time zone? [America/New_York]
> Do you want to generate a tasks.py/Makefile to automate generation and publishing? (Y/n)
Let’s keep it as simple as possible for this introductory tutorial, so answer
(Just type `Enter`)
Test
Test
(Just type `Enter`)
no
no
(Just type `Enter`)
no
So Pelican will create a very simplified project that we can use to start our blog. In a next post, we’ll run this command again to actually create the blog we’re going to publish, but here, as it’s just to introduce Pelican, let’s keep it simple.
Now let’s create our first example post. See that Pelican created a file structure like this in the blog folder:
content /
pelicanconf.py
publishconf.py
Inside the content folder, create a file, let’s call it teste.md (Very creative :p). In it insert the following content
Title: Test
Date: 2022-07-31 08:00
Category: General

Hi! This is my first post with Pelican!
This is enough for a post with Pelican. Title, date, category and the content itself.
Now let’s run a test server and see what our blog looks like.
pelican -r -l
The result should be something like this:
  --- AutoReload Mode: Monitoring `content`, `theme` and `settings` for changes. ---
Serving site at: http://127.0.0.1:8000 - Tap CTRL-C to stop
[22:56:36] WARNING Docutils has no localization for 'pt'. Using 'en' instead. log.py:91
        WARNING Watched path does not exist: /home/jcemelanda/projects/myblog/content/images log.py:91

-> Modified: settings, content, theme. re-generating...
Done: Processed 1 article, 0 drafts, 0 hidden articles, 0 pages, 0 hidden pages and 0 draft pages in 0.06 seconds.
Access the indicated address http://127.0.0.1:8000
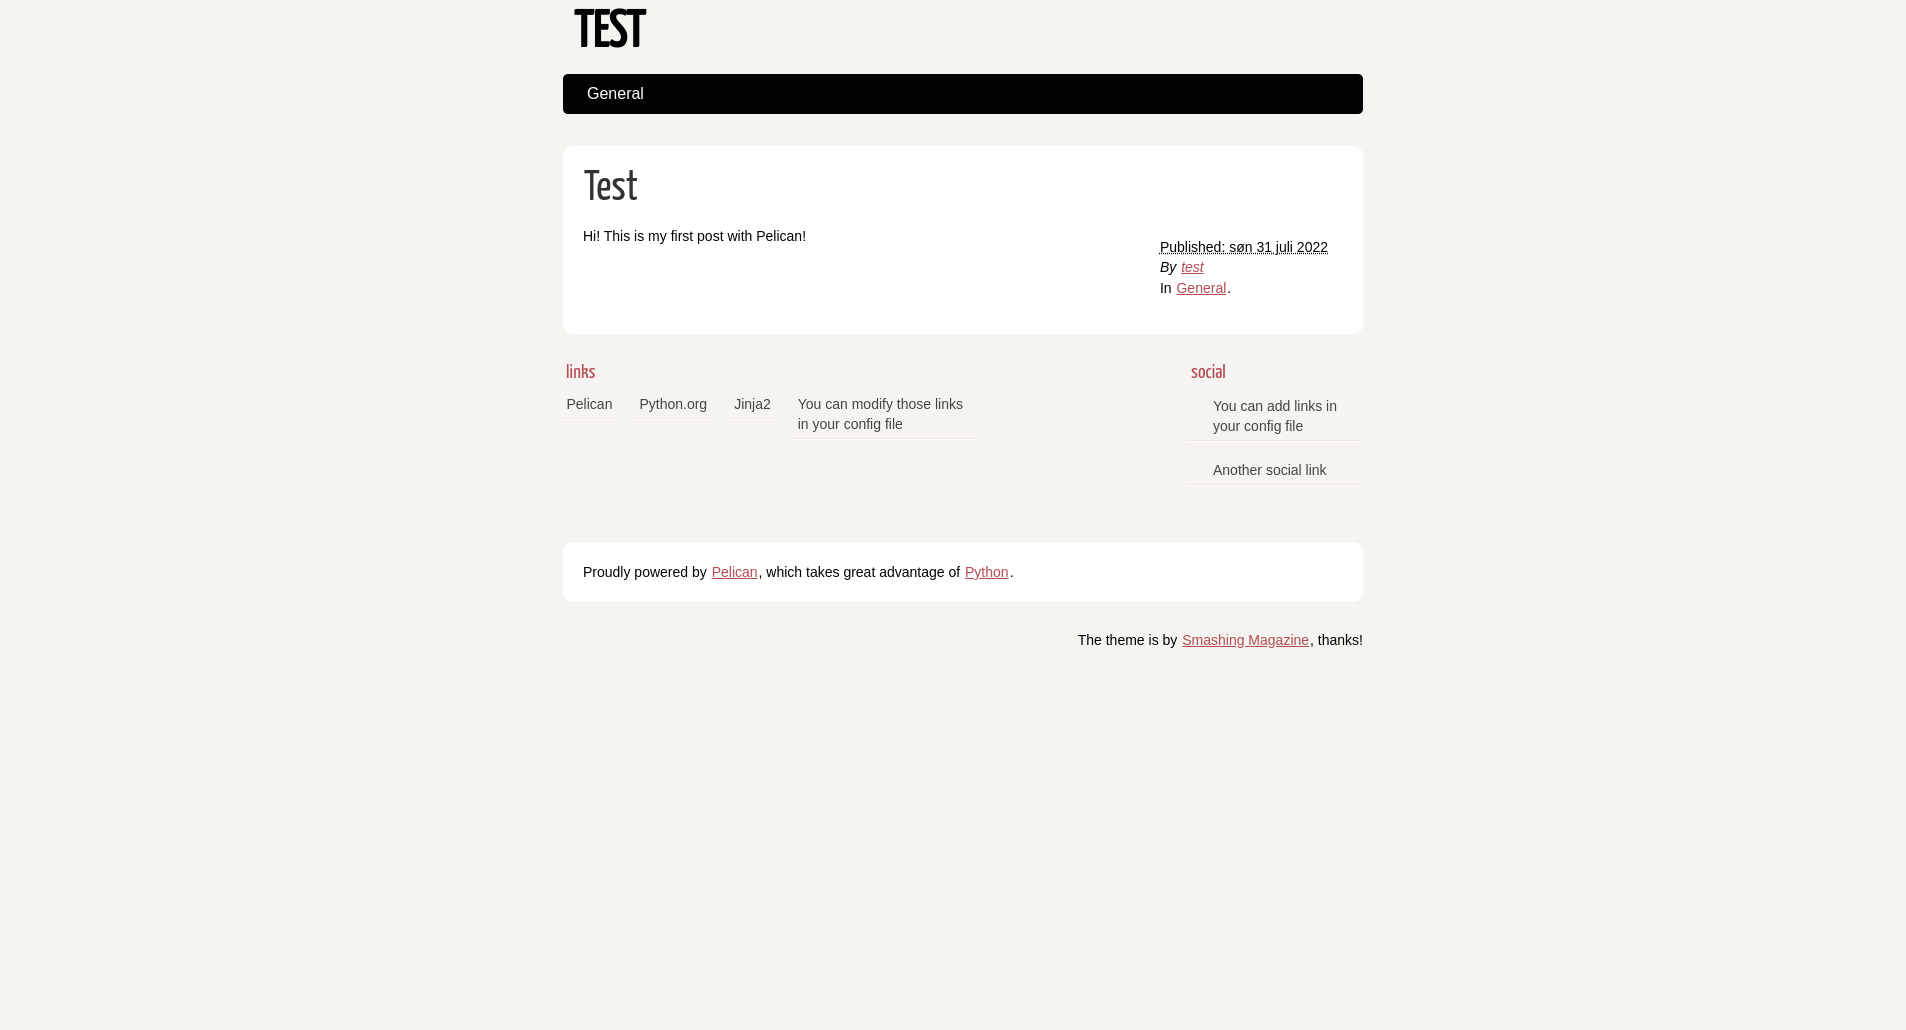
This should be what your blog looks like.
Now open your pelicanconf.py file. Your content should look like this:
AUTHOR = 'test'
SITENAME = 'TEST'
SITEURL = ''

PATH = 'content'
TIMEZONE = 'America/New_York'

DEFAULT_LANG = 'en'

# Feed generation is usually not desired when developing
FEED_ALL_ATOM = None
CATEGORY_FEED_ATOM = None
TRANSLATION_FEED_ATOM = None
AUTHOR_FEED_ATOM = None
AUTHOR_FEED_RSS = None

# blogroll
LINKS = (('Pelican', 'https://getpelican.com/'),
        ('Python.org', 'https://www.python.org/'),
        ('Jinja2', 'https://palletsprojects.com/p/jinja/'),
        ('You can modify those links in your config file', '#'),)

# Social widget
SOCIAL = (('You can add links in your config file', '#'),
        ('Another social link', '#'),)

DEFAULT_PAGINATION = False

# Uncomment following line if you want document-relative URLs when developing
#RELATIVE_URLS = True
This file is very self explanatory. This is where we tweak most of the Pelican settings.
Finally, open publishconf.py. Your content should look like this:
# This file is only used if you use `make publish` or
# explicitly specify it as your config file.

import them
import sys
sys.path.append(os.curdir)
from pelicanconf import *

# If your site is available via HTTPS, make sure SITEURL begins with https://
SITEURL = ''
RELATIVE_URLS = False

FEED_ALL_ATOM = 'feeds/all.atom.xml'
CATEGORY_FEED_ATOM = 'feeds/{slug}.atom.xml'

DELETE_OUTPUT_DIRECTORY = True

# Following items are often useful when publishing

#DISQUS_SITENAME = ""
#GOOGLE_ANALYTICS = ""
See that this file imports from pelicanconf, so here you can overwrite configurations, allowing you to have a configuration for your environment where you write posts and another for the effective publication of the site.
For the moment, this information is enough to go on, so don’t miss the next part of this tutorial where we’ll talk about Github pages and then put the two together :D
I hope you liked it and don’t forget to leave your opinions and questions in the comments!
See you in the next post!